|

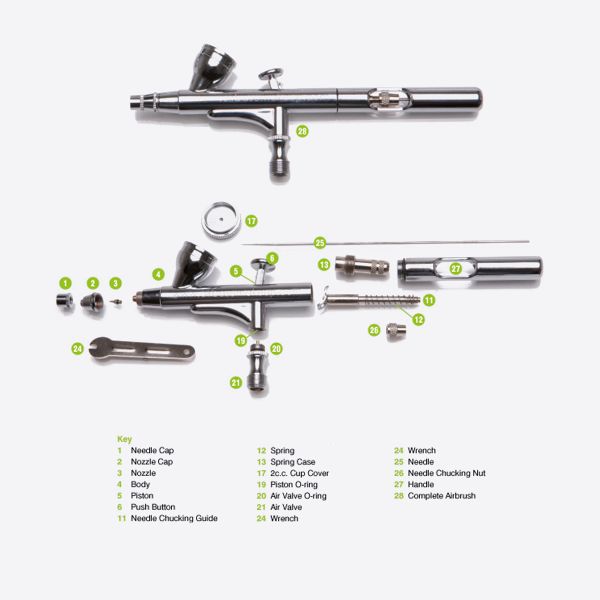
Replacement Single Action Airbrush Spare Parts.
See our Trouble Shooting Guide below for further help.
| Name | Part # | Description |
|---|---|---|
| Needle Cap | Part 1 | Replacement Needle Cap for your Airbrush. |
| Nozzle Cap | Part 2 | Replacement Nozzle Cap for your Airbrush. |
| Nozzle | Part 3 | The airbrush nozzle is a 0.35mm needle supplied with your Airbrush. Top tip: When replacing your nozzle using the supplied spanner be careful not to over tighten. |
| Piston | Part 5 | Replacement Piston for your Airbrush. |
| Trigger | Part 6 | Replacement Trigger for your Airbrush. |
| Needle Chucking Guide | Part 11 | Replacement Needle Chucking Guide for your Airbrush. |
| Spring | Part 12 | Replacement Spring for your Airbrush. |
| Spring Case | Part 13 | Replacement Spring Case for your Airbrush. |
| Cup Cover | Part 17 | Replacement Cup Cover for your Airbrush. |
| Air Valve O-Ring | Part 20 | Replacement Air Valve and O-Ring for your Airbrush. |
| Nozzle Spanner | Part 24 | To loosen, tighten and remove your Airbrush Nozzle. |
| Needle | Part 25 | Needles rarely need replacing, but are a crucial part of the airbrush. Treat with care and it won’t let you down. We recommend you carry a spare so you have ‘belt and braces’ and don’t get caught out if an emergency occurs! |
| Needle Chucking Nut | Part 26 | Replacement Needle Chucking Nut for your Airbrush. |
| Handle | Part 27 | Replacement Handle for your Airbrush. |
| Airbrush Body | Part 28 | Replacement Body for your Airbrush. |
| Size | 250ml |
|---|
Check that all the leads are connected correctly and the Compressor is operating. The green light should be on, on the Compressor.
YES: Go to Stage 2.
NO: Your Compressor has a 1 year warranty from purchase date. Please contact us for assistance.
Check that your Airbrush is correctly assembled, particularly if you have recently stripped it down for cleaning or maintenance.
Go to Stage 3.
Place the Trigger (Part 6) in the rest position.
Does the Airbrush trigger push down when pressed?
YES: Go to Stage 4.
NO: Your trigger is not positioned correctly. Please strip down your Airbrush and reassemble being sure to position the trigger so when depressed it pushes the spring loaded Piston (Part 5).
Does the Airbrush spray Airbase Thinner and Cleaner?
YES: Go to Stage 5.
NO: Go to Stage 7.
Half fill Airbrush cup with Airbase Thinner and Cleaner and replace the Cup Cover (Part 17).
Ensuring that the Nozzle and Needle cap (Parts 1 and 2) are on the Airbrush, block the needle cap using your finger. Push the trigger down and pull back as if to spray. This will back bubble the cleaning fluid and clear any blockages.
Spray all the remaining fluid through the Airbrush and try with foundation.
Is your Airbrush functioning normally?
YES: Fantastic!
NO: Go to Stage 6.
The problem is thick foundation. Add foundation to your Airbrush cup and a few drops of Airbase Thinner and Cleaner. The foundation will now spray ok.
Is your Airbrush functioning normally?
YES: Fantastic!
NO: Go to Stage 7.
Does the Needle (Part 25) retract when you push the trigger down and pull it back?
YES: Go to Stage 8.
NO: Go to Stage 9.
Does the Needle protrude beyond the Needle Cap? (Part 1)
YES: Your Nozzle is damaged and will need replacing.
SEE: How to guide for changing the Nozzle below.
NO: Go to Stage 9.
Useful tools:
Visit the Airbrush Cleaning and Maintenance section.
Unscrew Airbrush Handle (Part 27), loosen the Needle Chucking Nut (Part 26) and Spring Case (Part 13).
Gently push the Needle (Part 25) forward as far as it will go so that it protrudes beyond the Nozzle Cap (Part 2) but not the Needle Cap (Part 1).
Tighten all parts that you have just loosened. The needle will now retract when you push the trigger down and back and the Airbrush should spray.
Is your Airbrush functioning normally?
YES: Fantastic!
NO: Go to Stage 10.
Fully strip down your Airbrush, clean throughly and reassemble. If the problem continues, please contact us for assistance.
Useful tools:
Airbrush First Aid Kit
Visit the Airbrush Cleaning and Maintenance section.
Check that all the leads are connected correctly and the Compressor is operating. The green light should be on, on the Compressor.
YES: Go to Stage 2.
NO: Your Compressor has a 1 year warranty from purchase date. Please contact us for assistance.
Check that your Airbrush is correctly assembled, particularly if you have recently stripped it down for cleaning or maintenance.
Go to Stage 3.
Unscrew Airbrush Handle (Part 27), loosen the Needle Chucking Nut (Part 26) and Spring Case (Part 13).
Gently push the Needle (Part 25) forward as far as it will go so that it protrudes beyond the Nozzle Cap (Part 2) but not the Needle Cap (Part 1).
Tighten all parts that you have just loosened. The needle will now retract when you push the trigger down and back and your Airbrush will spray.
Is your Airbrush functioning normally?
YES: Fantastic!
NO: Go to Stage 4.
Does the Needle protrude beyond the Needle Cap? (Part 1)
YES: Your Nozzle is damaged and will need replacing.
SEE: How to guide for changing the Nozzle below.
NO: GO to Stage 5.
Useful tools:
Visit the Airbrush Cleaning and Maintenance section.
Unscrew the Airbrush Handle (Part 27), loosen the Needle Chucking Nut (Part 26) and Spring Case (Part 13).
Gently remove the Needle (Part 25). Unscrew the Needle Cap (Part 1) and Nozzle Cap (Part 2) and detach from your Airbrush.
Using a magnifying glass (if required) check the Nozzle (Part 3). The Nozzle's hole should be perfectly round. Check for fractures and closures of the hole.
Does the Nozzle have any damage?
YES: Your Nozzle is damaged and will need replacing.
SEE: How to guide for changing the Nozzle below.
NO: Go to Stage 6.
Useful tools:
Airbrush First Aid Kit
Visit the Airbrush Cleaning and Maintenance section.
Half fill airbrush cup with Airbase Thinner and Cleaner and replace the Cup Cover (Part 17).
Ensuring that the Nozzle and Needle Cap (Parts 1 and 2) are on the Airbrush, block the needle cap using your finger. Push the trigger down and pull back as if to spray. This will back bubble the cleaning fluid and clear any blockages.
Spray all the remaining fluid through the Airbrush and try with foundation.
Is your Airbrush functioning normally?
YES: Fantastic!
NO: Go to Stage 7.
Useful tools:
Airbase Thinner and Cleaner
Visit the Airbrush Cleaning and Maintenance section.
Fully strip down your Airbrush, clean throughly and reassemble. If the problem continues, please contact us for assistance.
Useful tools:
Airbrush First Aid Kit
Visit the Airbrush Cleaning and Maintenance section.

If your Airbrush continues to 'pass air' when your finger is not on the trigger, the issue you have is known as a ‘sticky trigger’. This is easily solved by cleaning the requisite part of the Airbrush.
To Clean: Strip down airbrush and drop 3-4 drops of Airbase Thinner and Cleaner or pure alcohol into the piston area.
Reassemble your Airbrush.
When reassembled, depress and lift the trigger to create movement in the piston and work the solution into the ‘sticky’ area.
If necessary, remove Piston (Part 5) and clean area and part thoroughly.
Useful tools:
Airbrush First Aid Kit
Airbase Thinner and Cleaner
Visit the Airbrush Cleaning and Maintenance section.
Check that all the leads are connected correctly and the Compressor is operating. The green light should be on, on the Compressor.
YES: Go to Stage 2.
NO: Your Compressor has a 1 year warranty from purchase date. Please contact us for assistance.
Check that your Airbrush is correctly assembled, particularly if you have recently stripped it down for cleaning or maintenance.
Go to Stage 3.
Is trigger pushing down fully?
YES: Go to Stage 4.
NO: Strip down your Airbrush and remove the Piston (Part 5).
Drop 3-4 drops of Airbase Thinner and Cleaner or pure alcohol into the area where the piston is located.
Reassemble your Airbrush.
When reassembled, depress and lift the trigger to create movement in the piston and work the solution into the Piston area (Part 5).
Useful tools:
Airbrush First Aid Kit
Airbase Thinner and Cleaner
Visit the Airbrush Cleaning and Maintenance section.
Fully strip down your Airbrush, clean throughly and reassemble. If the problem continues, please contact us for assistance.
Useful tools:
Airbrush First Aid Kit
Visit the Airbrush Cleaning and Maintenance section.
Useful tools:
Airbrush First Aid Kit
Visit the Airbrush Cleaning and Maintenance section.
Please note: If the Nozzle has sheared off, you will need a Nozzle Repair Tool to remove the thread. These can be purchased from Airbase or are included in the Airbrush First Aid Kit. Please contact us if you wish to order the Nozzle Repair Tool.